
White Balance in Photography.
White balance in photography is defined as an adjustment that the camera makes so that the colours of your image are seen naturally without being affected by the colour of the light source of the scene.
When your camera adjusts the white balance, it’s compensating for the colour hue of your light source so the colours in your image stay true to reality. That is, the pure white parts of your image look white and don’t pick a warmer or colder tone due to the hue of the light source.
In photography, we often work with the noonday sun as an ideal light source. While perfectly balanced, not all lighting is as neutral as daylight. When working indoors or outdoors (in conditions other than pure daylight) and mixed lighting environments, the changes in hue will have a strong impact on the colours of your photo. White balance is important because, without it, colours in your images will take on warm or cool tones that you may not notice while photographing (something also known as “colour cast”).
Our eyes and brains are very good at filtering out (white balancing) unnatural hues. However, a digital camera captures exactly what’s there, and the resulting image may look nothing like what you expect. In short, the white balance of an image can be affected by the colour temperature of light in the environment.
In order to understand white balance in photography, we need to learn the basics of how white balance and colour temperature work.
White Balance and Colour Temperature
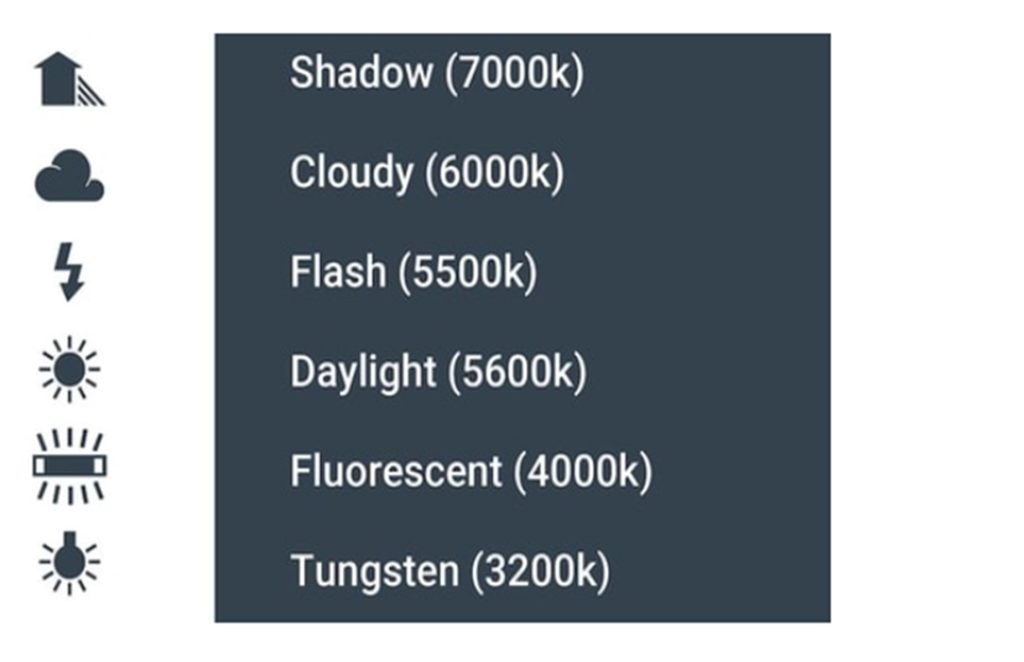
White balance and colour temperature are very closely related. We describe colour temperature in kelvins, a scale used to measure the colour temperature of a specific light source. The abbreviation for describing kelvins in white balance is simply “K”.
Colour temperature is a physical property of light, and each light source is identified by a different colour temperature.
For example, candlelight and tungsten are extremely warm in colour temperature, with values ranging from 1500-3000 K. Fluorescent light is related to the slightly warm cast of fluorescent lighting (typically around 4000-4500K). The colour temperature of the Daylight white balance setting is relatively neutral at 5000-6500K, and will typically be the best choice for shooting outdoors. However, if the sky becomes overcast, you may need to choose the cloudy white balance setting, around 7500 K, to add warmth to the blue hues.

The colour temperature and white balance settings in-camera can be a bit contradictory. When it’s set to auto, your camera automatically compensates for the colour temperature. However, if you want your picture to look colder, you’ll have to select a warmer colour temperature and vice versa so your camera can compensate with the opposite colour temperature. We’ll see this in some white balance examples below.
Colour temperature is only part of the puzzle but is fundamental for explaining white balance in photography.

Setting the White Balance in Camera
Your white balance camera settings ensure you have the most accurate possible colours. While automatic white balance is the most common option, there are many choices to work with.
The AWB in-camera setting is the one the vast majority of photographers stick to. We can define auto white balance as the adjustment that allows the camera to select the best white balance and colour temperature settings for a specific scene.
Digital cameras are best at finding the correct white balance from 3200-6500K. In other words, they’re very accurate at selecting the best colour temperature between a warm indoor and daylight white balance, the light environments photographers usually work with.
White Balance Pre-sets
Semi-Automatic White Balance is perfect for environments where a single type of light dominates the scene. Each of the in-camera white balance pre-sets has a symbol that will help you adjust the necessary setting faster and compensate for the best white balance in your image.
White balance symbols commonly used by most camera brands include a cloud for overcast skies or a bulb for indoor lighting (white balance tungsten). The sun is always white balance daylight, and fluorescent light white balance is usually a picture of a fluorescent fixture.
Auto White Balance is the tool you’ll use for most situations. Modern cameras are very good at selecting the correct white balance for each scene. However, when the colour temperature is warmer than 3200K (tungsten) or colder than 6500K (daylight), auto white balance can struggle.
In these situations, selecting a Semi-Automatic white balance mode is best.
You can also set the white balance manually – but this is not something covered here
White Balance in post processing
If you’re shooting RAW, the white balance is one of the few adjustments that you can completely change in post-processing without affecting the quality or sharpness of your image, something that’s not possible when we make other adjustments in post, like those related to exposure.

Shade White Balance 7500k

Cloudy White Balance 6500k

Daylight White Balance 5600k

Flash White Balance 5500k

Auto White Balance 5300k

Fluorescent White Balance 3800k
Tungsten White Balance 2850k
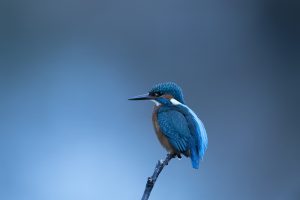
All images of the Kingfisher. Taken in Motherwell. Scotland. Nikon D850. F7.1 1/1000. ISO1000. -0.33. 600mm lens. Shot in Aperture Priority
All kingfisher images are shot on the same camera settings with different white balance settings. None of the images have been processed or colour corrected. This clearly shows the difference in the white balance settings and the impact that it can have on an image.
A summary of White Balance
In almost all situations I will shoot on Auto White Balance. The majority of the time the camera gets the situation right and the results are realistic and as I want them to be.
The only real exception to this is when I shoot sunsets or sunrises. In these situations, you will find that the camera will try to cool the colours down to balance the whites.
So to compensate for this you simply switch to cloudy or shade white balance which will warm the whole scene up and will render the warm oranges, reds and yellows a more realistic colour.

Lion. Masai Maral. Kenya. Nikon D4s. F8 1/1000. ISO400. -2.67. 80-400mm lens. Shot in Aperture Priority.
Auto White Balance. Adjusted in Camera Raw to demonstrate this example

Shade White Balance. Shot this way to bring out all of the yellows and golds in the setting sun
Both images are unprocessed with no adjustments
To find out more you can buy my ebook for just £2.99 on Amazon 436 pages packed full of images and tips on wildlife photography.
The Ultimate Beginners Guide to Wildlife Photography – from Taking a Shot to capturing a moment – buy it here
All Aperture diagrams used with permission from Capture the Atlas
If you like this post then why not check out my post on Understanding Angles of Light in Photography