
Mastering Angles of Light.
Light is the one thing that all photographers need.
Good light is what all photographers search for.
Light and how you interpret it and use it can make or break an image.


The Golden hour is what wildlife photographers search for. It is the first hour after sunrise or the last hour before sunset. These times provide the perfect light to capture stunning images. Learning to use the power of the golden hour is a tool that all photographers can use.
So you get out and you have this wonderful warm light, with fantastic colours, all of the different oranges, yellows and reds. The evenness of the light. But what do you do?
How do you maximise your one hour of Golden Light?
You can do it by mastering the angles of light.
There are 3 main things to look for with the subject and the way that the sun lights it.
Do you want to shoot in to the sun, (backlight it), Light it with the sun behind you (frontal lighting) or position yourself with the sun at the side of the subject (side lighting).
Camera Settings for Golden Light.
Generally I am a fan of using Auto White Balance for wildlife photography. It usually does a good job of reading the scene and is one less thing to worry about when you are shooting, and if you shoot in raw, then you have the opportunity in post processing to change the white balance if required.
However for the Golden Hour If you shoot on auto white balance the camera will try to make your whites very white. I like to try and use Shade White balance, it will warm the colours and tones back up and get your images looking close to the lighting conditions.
Angles of Light
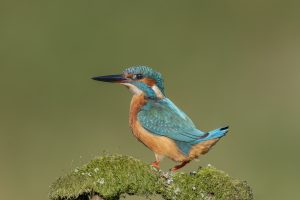
Front Lighting
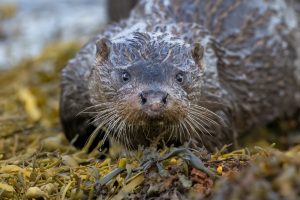
Most people will automatically default to front lighting, positioning the sun behind them, this does emphasise the detail and catchlights in the eyes, but if used in every situation then your portfolio will become very one dimensional and although will showcase lots of well lit images, it will lack the diversity of a portfolio that explores other options and techniques.
This technique does make your images pop. It also works well on overcast days as the light is nicely diffused. You should avoid using this for bright overhead sunlight as it enhances the shadows in the image.
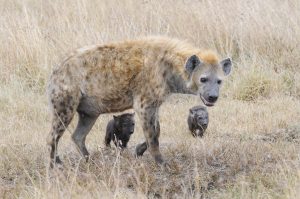
Side Lighting
Just positioning yourself so that the light is at 45 degrees to your subject can make a massive impact on your images, it can emphasise texture and can add mystery, emotion and drama in to your image


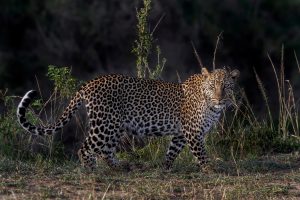

Back Lighting
Backlighting is more technical and more difficult to master, but can have more impact on your images and create something different for your portfolio.
There are 2 main situations where I use backlighting.
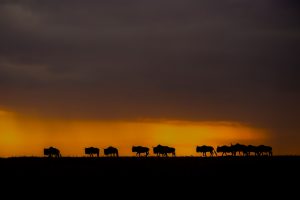
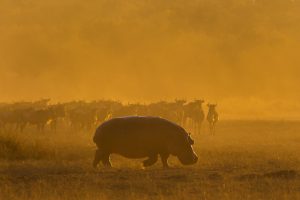
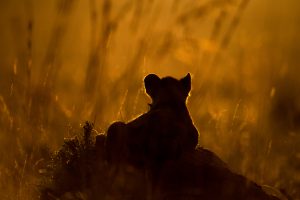
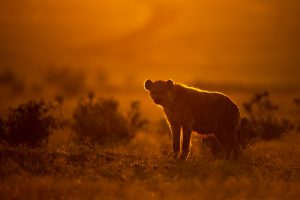
Silhouettes – Pre sunrise or post sunset, when the sun is still below the horizon is the best time to shoot this. To make an effective silhouette you need to ensure that the shape of the subject is distinctive and stands out on the horizon. Generally speaking you should try to shoot the subject in profile, to further emphasise the shape of the animal.
I shoot in aperture priority, so when I am shooting a silhouette, I will set the aperture at f8 or above to increase depth of field. Then I will set the exposure compensation for minus 2. I will take a test shot and review the histogram, it is important to check the histogram to ensure that any areas of bright sun have not caused the highlights to be blown. You do this by looking at the right of the histogram and checking that there is a small space between where the data has been captured and the edge, If all of this is fine then I will start to look more at composition and creating the image that I want. If the image is still looking too bright then I would reduce the exposure compensation further to darken the shadows and reduce the highlights. Most cameras have a feature called “blinking” which is where any areas of clipped highlights will blink a red colour, if you do see this then you continue to reduce the exposure compensation and increase the aperture until they disappear.
Post processing also plays an important part in shooting silhouettes. If you are able to capture the subject with definition from the background then you would darken the blacks and the shadows further in post processing to achieve the desired effect. If you are not able to achieve separation of the subject from the background then you can use post processing to lighten the shadows on part of the image to reveal more detail, whilst still maintaining the beautiful colours in the sky. You can achieve this by using a linear gradient mask in camera raw or a Radial mask. Lightroom and Photoshop have similar tools but I like to use camera raw.


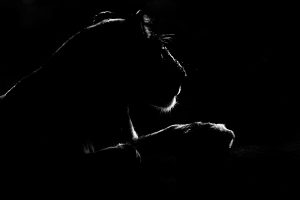
The other technique that I love is rim lighting. You only have a very small window to capture this when the sun is just above the horizon. It works the best with animals that have fur or feathers to illuminate in the backlighting giving the effect. This will only happen effectively if the subject is on a darker background.
When exposing for this you need to expose only for the highlights. It doesn’t matter if the shadows are clipped as in most cases you will be looking for a pure black image with a rim light. The most common mistake to make with this is to over expose the highlights, that is why it is important to review the histogram after the first image has been taken. The same applies to rim lighting as to silhouettes, ideally your subject will be side on and will have a distinct profile.
The background does not have to be completely black, just darker than the subject.
Post processing is also important here, you can either choose to make the image dark with just the rim lighting or you can bring up the shadows again to show some detail and definition in the subject.
The angle of light is not just important in the golden hour. Both front lighting and side lighting can be applied at any time.
When you are shooting it is important to understand how to use each of the techniques detailed above and when is best to use them. With wildlife the subject may move and then you will have to change your technique and approach as needed, or move if you can do so without disturbing the subject.
It can be extremely frustrating on safari for example in Masai Mara, you want to try backlighting in the golden light, and then all of the other vehicles line up with the sun behind them, it has happened to me many times and you then just end up with images of vehicles in the background.
In general terms there is really nothing you can do with about this other than get out as early as you possibly can and look for subjects and hope that you have the time to produce the images that you want to.
But these techniques don’t just apply to Africa, they can be applied anywhere. The best thing to do is practice. If you have an area of water near you like a lake, this is ideal as you can try backlighting the water birds using the texture of the feathers to create rim lights, or silhouette them against the water.
Click here to read about applying these techniques when photographing in hides