The Four Types of Wildlife Photography: From Proof to Creating Moments
Learn The Four Types of Wildlife Photography: From Proof to Creating Moments. Wildlife photography is a blend of art, science, and patience. Every image serves a purpose—whether it’s a simple record or a powerful story that moves people. Understanding these four approaches will help you grow as a photographer and create images that resonate.
In my experience most wildlife photographers when they see something just start shooting and hope that they may get “something”. This is certainly the case around big sightings like the migration in Kenya or even in hides. The desire to “get the shot” far overcomes any natural instinct to do something different and creative. I believe that there are 4 types of wildlife photography and therefore wildlife photographer:
- Proof – Just a snapshot of what is there.
- Document – Spending a little bit more time with the subject and getting some images of behaviour
- Narrative – Starting to think about telling the story and bringing the scene to life
- Creating – Taking complete control over how the image will look by making informed decisions with camera settings and the use of light
Most beginner photographers never make it out of Proof stage and very few make it out of the Document Stage. This is not a criticism it is a learning curve that all photographers go through and the very best wildlife photographers spend more time in Narrative and Creating and this is what makes them stand out in their field.
1. Proof of Seeing Something
This is the foundation of wildlife photography—capturing an image simply to show you saw the animal. This is about capturing an image as soon as you see it in case it disappears. It doesn’t matter about the light, the composition or anything, it is just about getting an image. If then the animal disappears at least you have something.
Purpose: Evidence of presence, often for birdwatchers, researchers, or personal records.
Characteristics: Quick, opportunistic shots with minimal planning.
Technical Tips: Always go out with default settings so you are ready to capture something that happens quickly. I always set my camera up at 1/1000s. Aperture wide open. Auto white balance. Auto ISO. Continuous Aotofocus, Don’t worry about perfect composition—clarity matters most.

Example: A record shot of a difficult to see bird perched, even if the light and background aren’t ideal.
2. Documenting Something
This approach goes beyond proof—it aims to record behaviour, habitat, or life stages for education or research. This is the stage that most photographers live in. It is also the stage that most photographers get stuck in. It is about capturing an image of the subject that is a solid sharp, well composed, well exposed and well framed, nothing wrong with the image but nothing is different about it. It is the type of image you would see in a textbook, technically excellent but it is kind of boring and uninteresting.
Purpose: Inform and educate, often used in conservation or scientific studies.
Characteristics: Clear, context-rich images showing the animal in its environment or doing something.
Technical Tips: Include habitat elements for ecological context. Use mid-range lenses (100–300mm) for balanced framing. Shoot in natural light for authenticity.
 Example: Mating lions. Greeting each other and strengthening their pair bond
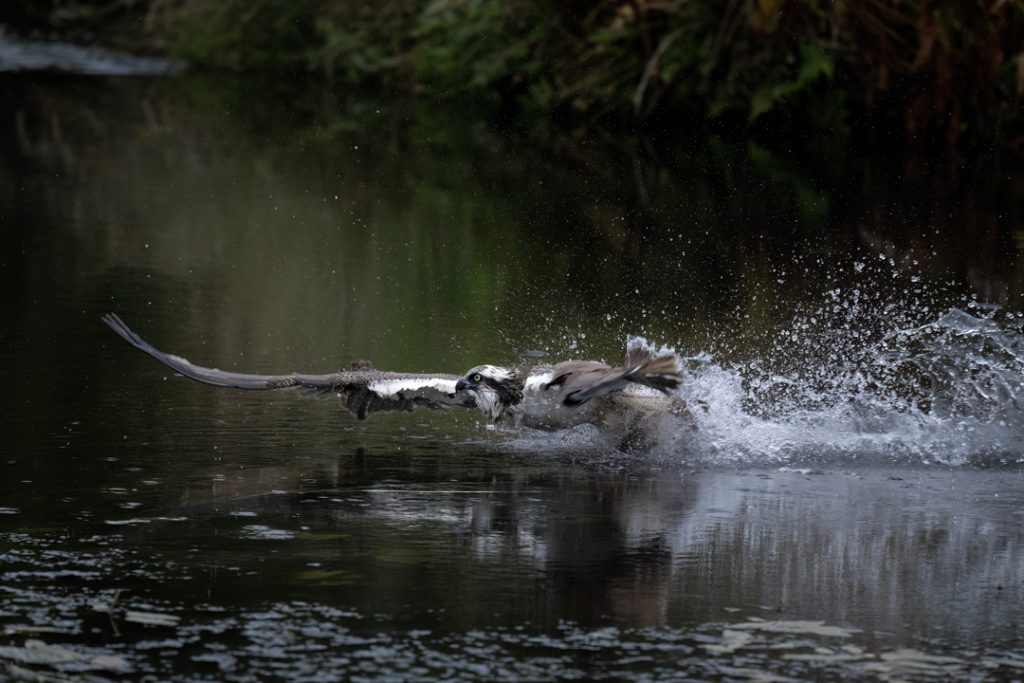
Example: Fishing Osprey. Osprey leaving the water after just catching a fish
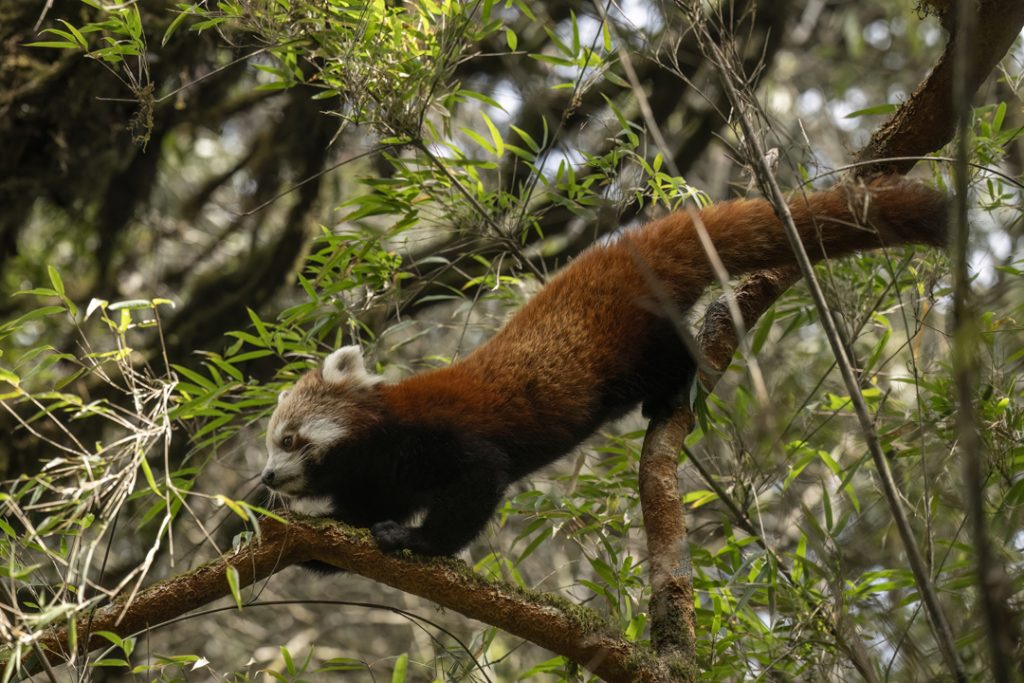
Example: A Red Panda making its way through the tree-tops
3. Adding a Narrative and Story
Photography becomes storytelling—capturing emotion, drama, and relationships. You are starting to tell a story. What is the animal looking at, where does it live, where is it going, what happens next. To be good at this stage you need to have a basic understanding of the subject that you are photographing. This makes it easier to anticipate specific behaviours.
Purpose: Evoke feelings and connect viewers with the subject’s world.
Characteristics: Thoughtful composition, timing, and attention to behaviour.
Technical Tips: Look for interactions—predator-prey dynamics, nurturing moments, or playful behaviour. Use composition tools like leading lines and rule of thirds to guide the eye. Experiment with depth of field to isolate subjects.
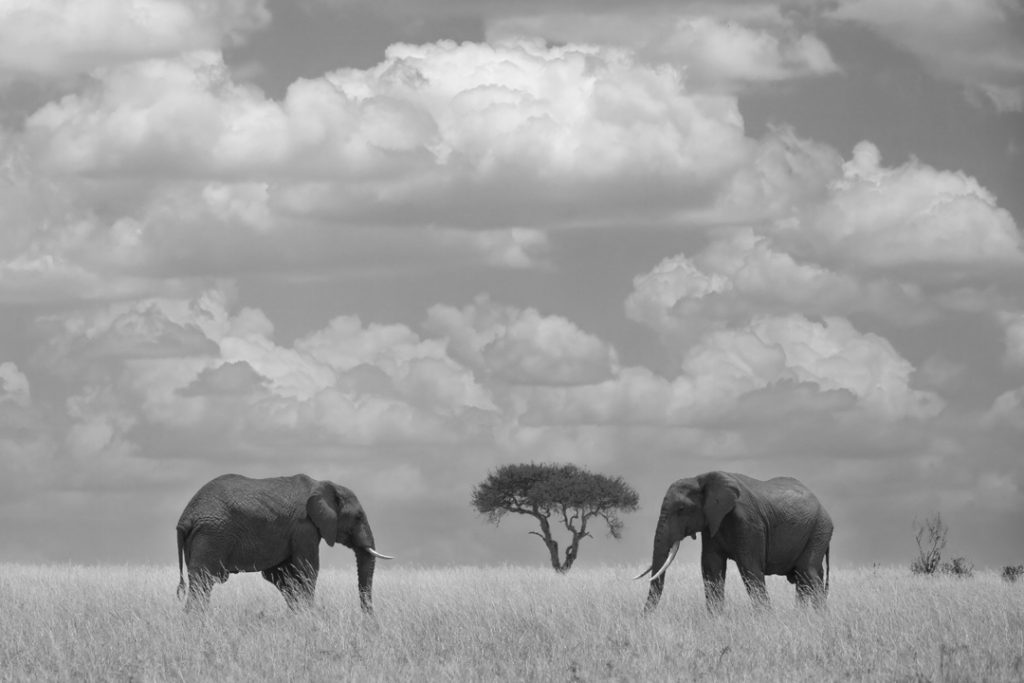
Example: Two Elephants in the environment shot wider to include the landscape and the lonely acacia in the middle
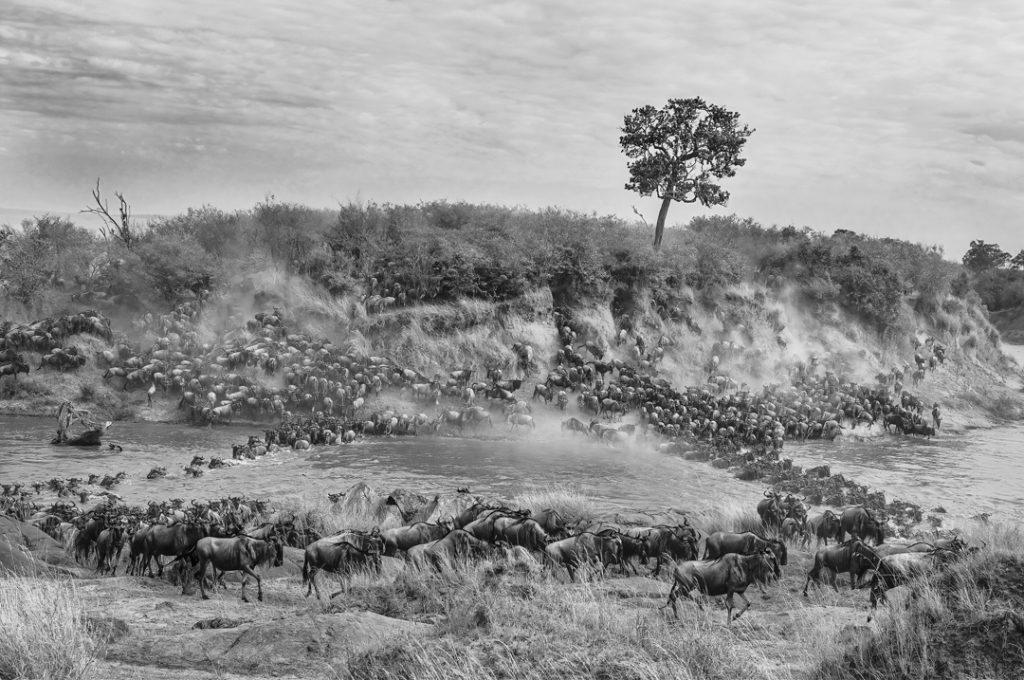
Example: The great Migration, shot with a wide angle lens to show the volume of wildebeest crossing the river.
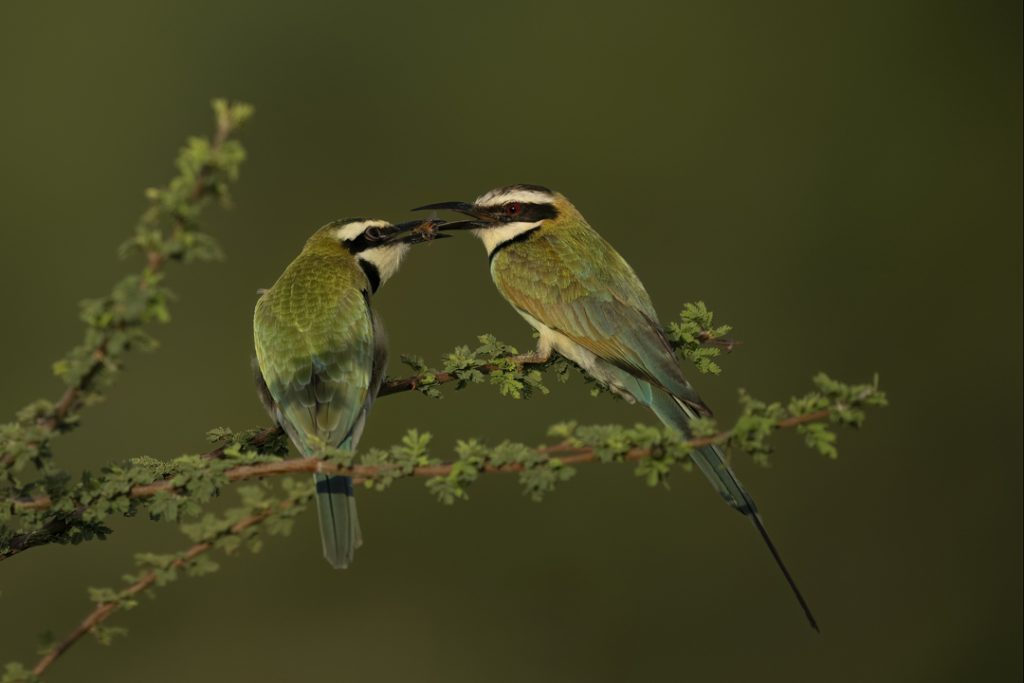
Example: A The moment where the adult bee-eater feeds its young
4. Creating a Moment
The pinnacle of wildlife photography—capturing a decisive, emotional, or dramatic instant that feels timeless. This is where you take over. You make decisions in camera to bring your vision and the scene to life. Do you slow the shutter speed down to show motion, do you pick out interesting colours in the background, do you try ISM techniques or zoom bursts. Do you go to the limits of exposure and shoot high key or low key. This is the stage where you stop documenting and start creating art.
Purpose: Freeze an unforgettable moment that resonates deeply.
Characteristics: High technical skill, anticipation and awareness of the whole scene, a stand out image being created rather than just observed.
Technical Tips: Use fast shutter speeds (1/1000s+) for action shots. Continuous autofocus and burst mode are essential for fleeting interactions.
Or, make different decisions creatively to use the available light or show something different with creative use of shutter speed or camera settings.

Example: A Grey Wagtail sat on the rocks. Only the rock area is lit by the sun shining through the trees and by under-exposing in camera it creates this effect.

Example: A Rhino Horned Lizard silhouetted on the side of the tree. Created by standing at the opposite side of the tree to all the other photographers and shooting in to the light.
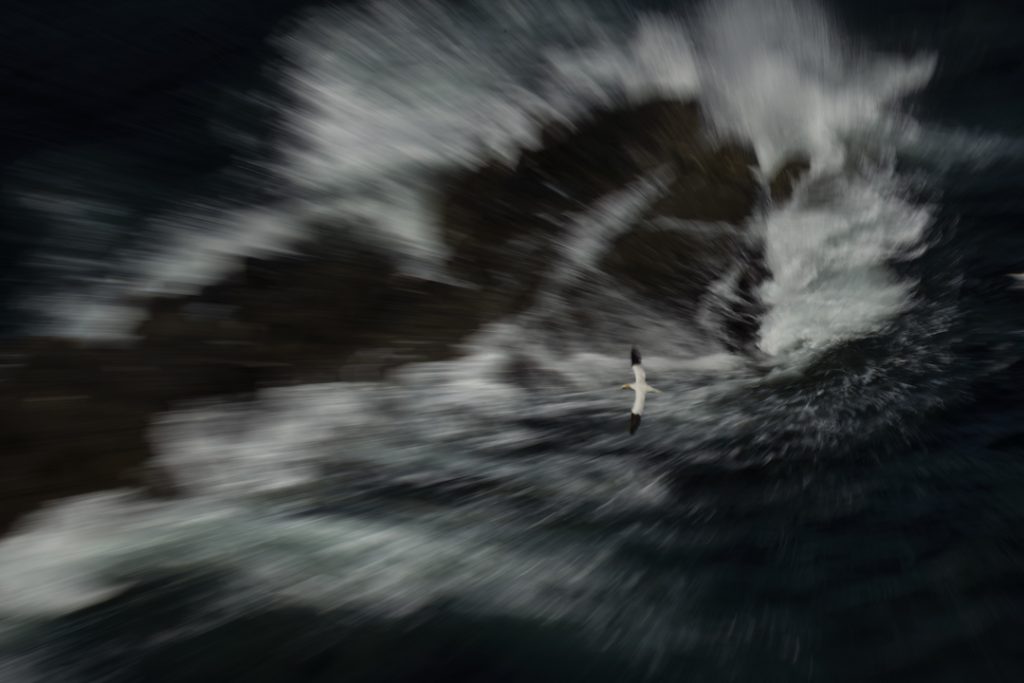
Example: A Gannet flying over the waves crashing on to the rocks. Shot at 1/50s and panned with the gannet and then zoom burst as it fly’s over the rock. 2 camera movements all in one exposure.
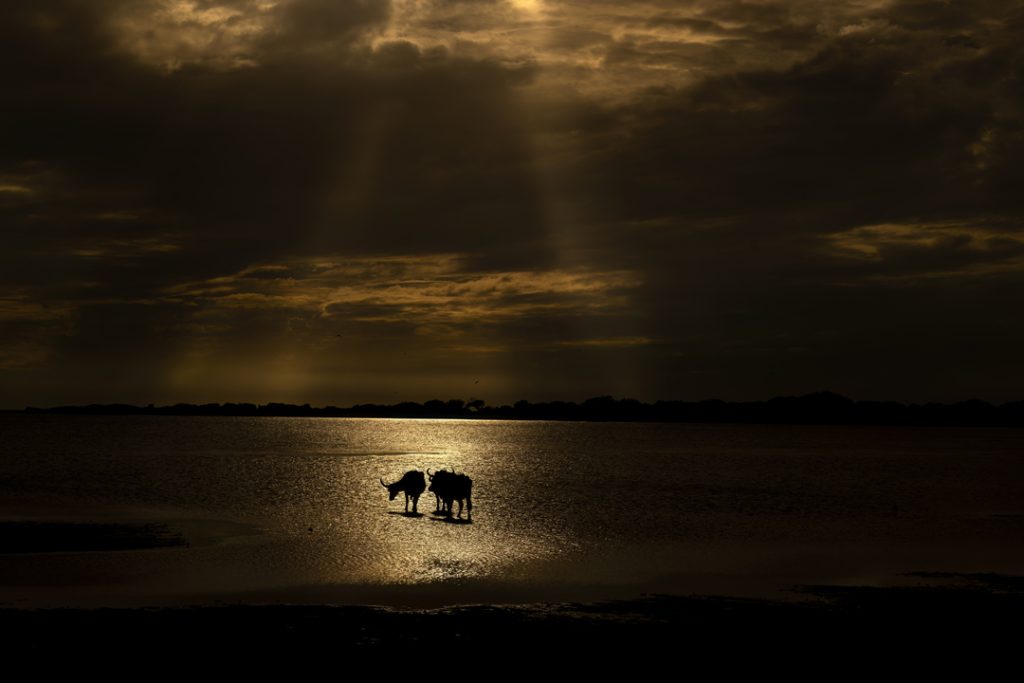
Example: Water Buffaloes stood in a pool of light with the sun rising and lighting the scene. Image underexposed in camera to increase the contrast between the dark and light areas

Example: Group of wildebeest running across the bright grass. Overexposed by 3 stops at a slow shutter speed to blow out the highlights and create motion.
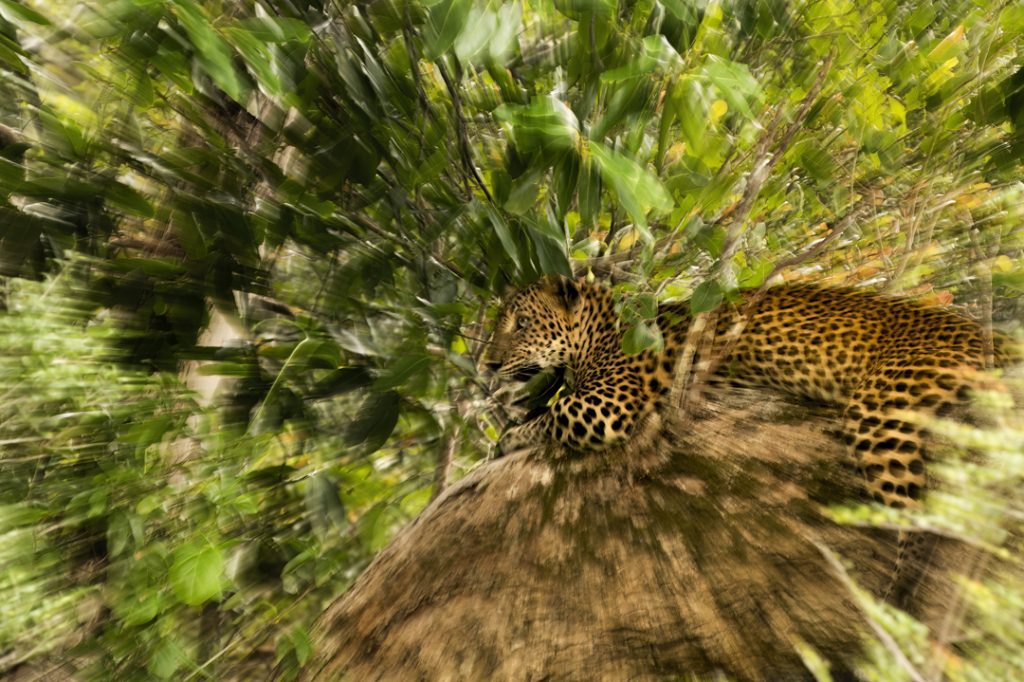
Example: A Leopard resting in a tree. Using a slow shutter speed and zooming in and out to create this zoom burst effect. A different way of shooting a leopard in a tree.
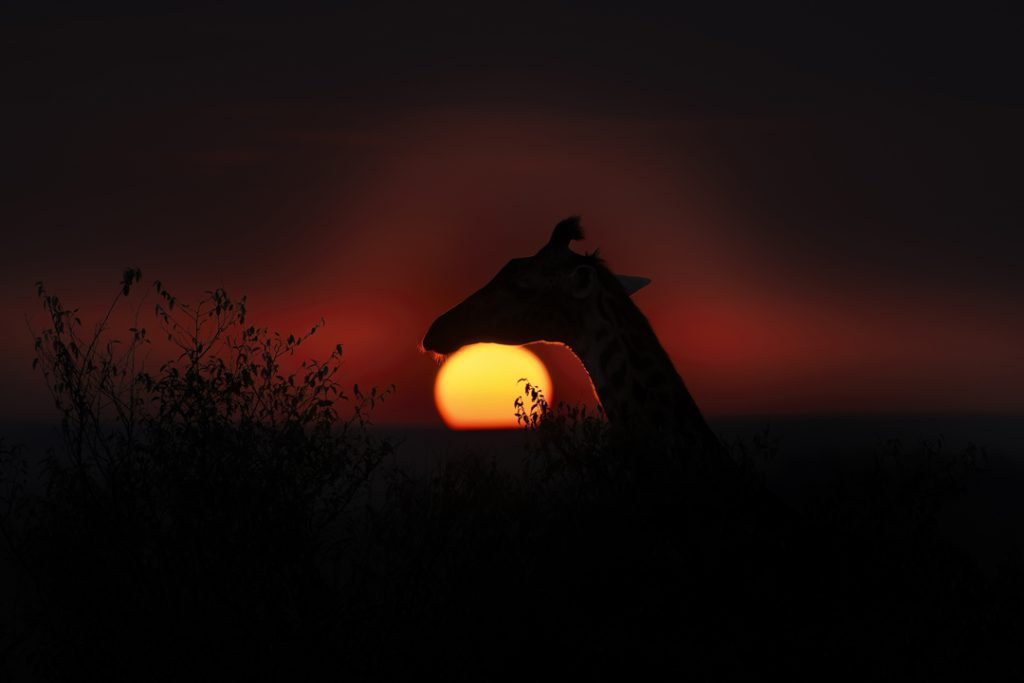
Example: A giraffe at sunrise. Waiting until the critical moment where it looked like the giraffe was resting its head on the rising sun.
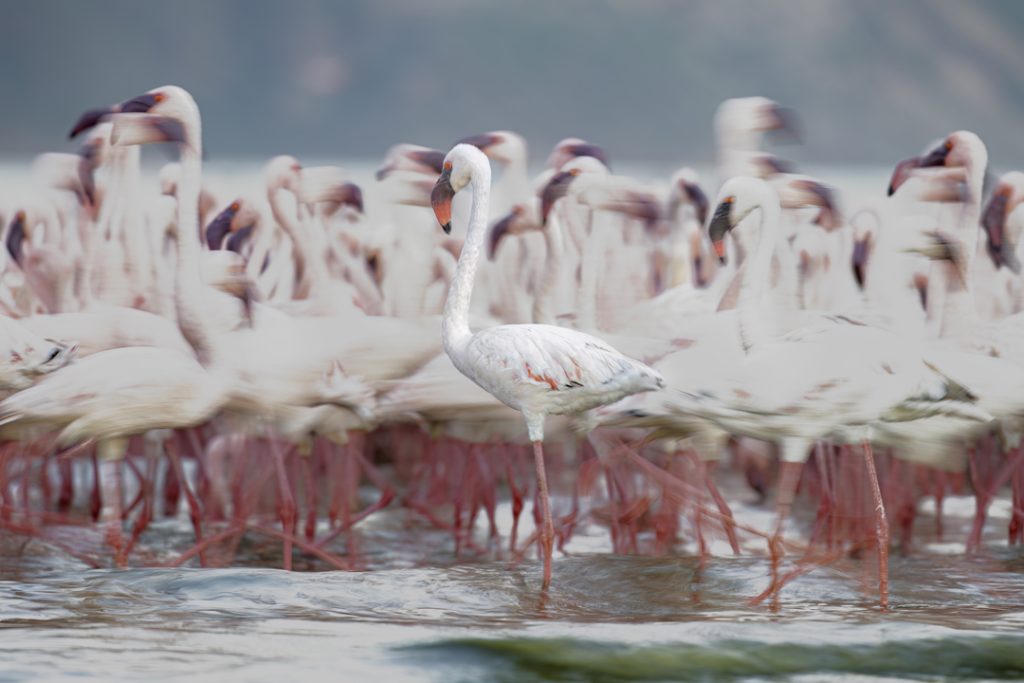
Example: Flamingos. Taken with a very slow shutter speed to show the motion of the birds moving in the background behind the one stationary bird.
Key Takeaways
Proof = Evidence
Documenting = Education
Narrative = Connection
Moment = Emotion
Mastering all four approaches will make you a versatile and impactful wildlife photographer.
The reason why this matters is because when you are at a big sighting you move up and down these 4 different areas of photography. You start with a proof shot. If the subject stays you start to document, you then move to narrative and try to tell the subjects story, Then if the sighting changes and the animal moves you go back to documenting, then when it settles you move back to narrative. Having a plan like this stops you from panicking at a sighting and then helps you create it helps you to think about what it is that you want to show in your images. It gives you a plan.
Most photographers spend their whole time in documenting and produce technically good images, but they are all the same. If you want a portfolio that really stands out, you need to focus on the narrative and creative stages. But to get there you have to go through the proof and document stages.
Practice
To help you build this in to your everyday photography then practice locally with common subjects such as swans, herons and ducks. Start off by documenting and then start telling their story and finally look at producing interesting and different images creatively that could be used as artwork.
One of the reasons why a lot of people don’t ever move past documenting is the “fear” of missing a shot. It is harder to take that chance and try something different but in my opinion, it is better to miss documenting a shot than it is to miss creating something different and something unique. This is where practicing on common subjects is very useful and accelerates the learning process.
Whenever I photograph a sighting I follow this process:
Proof – Quick snapshot of the subject to show that I have seen it.
Document – Capture some behaviour shots. Focus on the right exposure and focus.
Narrative – Put the camera down and watch. Now pick it back up and tell its story. Zoom out and show more of the environment, look for interesting behaviour and interaction.
Create – I always do the following.
• Shoot at -2EV and -3EV. Look for areas of contrast between highlights and shadows and dark and light areas.
• Then at +1 and +2. Look for brighter backgrounds and enhance the detail and colour in the image.
• If the subject is moving slow the shutter speed down and pan.
• If the subject is stationary try ICM or zoom bursts
• Look at the background – can I move to get a more interesting image.

Example: A Grey Heron taken at 3 stops under exposed to black out the background and then using the light coming from the side to highlight the feather texture and detail on the heron.

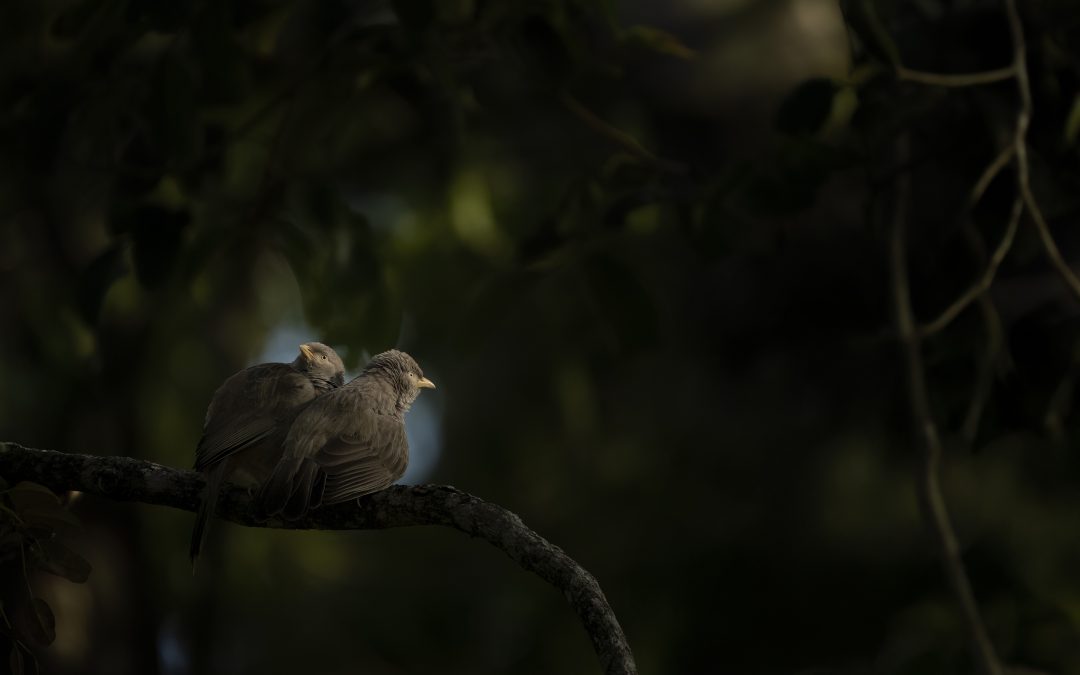
Example: Yellow Billed Babblers. By moving a couple of steps to the left I was able to frame the birds using the light shining through the trees.
Extra Tips for Success
- Know Your Subject: Research animal behaviour to anticipate moments.
- Respect Nature: Avoid disturbing wildlife; ethical photography matters.
- Practice Patience: Great shots often require hours of waiting or lots of planning
- Get to know your camera. Not only how the camera works but the biggest secret is to know how to get your camera to see the idea and creative vision that is in your head.
If you have enjoyed reading this blog post and want some ideas then why not read these blog posts next:
Overcoming a Creative Block in Photography
How to use Exposure Compensation to be more creative in your wildlife photography.
Storytelling in Wildlife Photography
The Art of Panning in Wildlife Photography
I also cover the creative and storytelling stages on my Advanced wildlife photography workshop and my Creative Wildlife Photography Workshop